Fujifilm Instax Mini 9 Box Scrapbook

Photos Coming Out White or Black in Instax Mini? 4 Useful Tips to Avoid Over/Under Developed Films in Fujifilm Instax Mini 9
Fujifilm's Instax 9 Mini is a very cool instant film camera for multiple use. The biggest fear every instant camera user will have is whether that special photo taken at that exciting moment will be correctly developed or not once they click the shutter. Most common problem that a first-time user will face is that their Instax Mini 9 pictures come out black or white. Since film development is an automatic process and takes about 90 seconds to see the result, this time gap between clicking the camera and seeing the developed photo is mostly full of anxiety and fear for photographers who aren't used to the instant film cameras yet.
Instax Mini 9 Photos Come Out White or Black? Follow These Tips:
1. Make sure the light meter is not obstructed and the camera is held properly

One of the most common mistakes people do in a hurry or excitement is that they obstruct the light meter on their Fujifilm Instax Mini 9, which makes it difficult for the camera to judge the amount of light coming from the subject. This makes the camera unable to decide the setting it should suggest you to get the right exposure in your photo. So, the light meter must be free from any kind of obstruction from your fingers to help the camera deduce the right setting for your photo as per the ambiance.
RELATED: 10 Best Instax Mini Film Frame Designs
How to hold the camera properly to avoid white, black or blurry photos?
When holding camera in portrait mode, hold it on the right side of the camera and while holding it in a landscape mode, make sure the flash light is on the top.
2. Adjust the exposure dial accordingly

The Instax Mini 9 comes with a exposure dial which has to be manually set. When the camera is on, a reddish orange light glows in one of the settings in brightness adjustment dial, which is decided by the camera itself after the light meter has judged the amount of light coming from the subject.
All you have to do is rotate the dial around the lens until the dot lines up with the light (which is the very important as this will confirm the camera that you are going to take the photo with the suggested setting). There are 5 settings in the brightness adjustment dial:
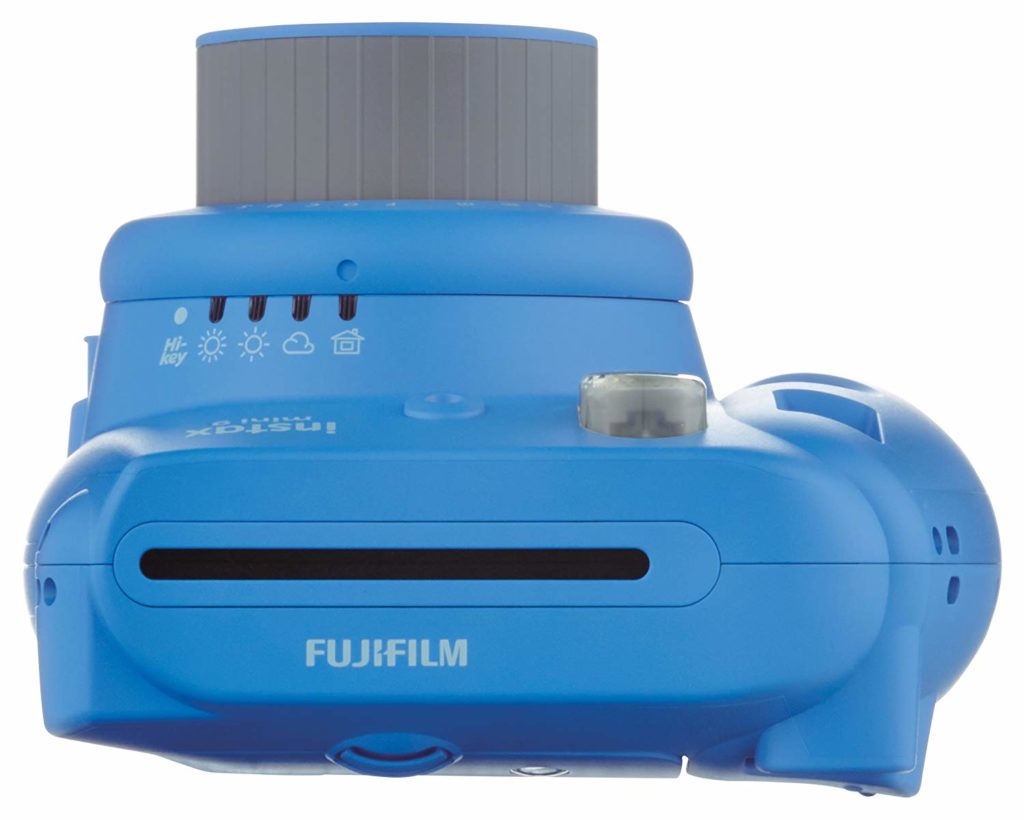
- INDOOR SETTING – When you are inside a room and away from direct bright sunlight trying to take the photos, the red light glows in this setting.
- CLOUDY SETTING – When you want to take a picture on the day when it's gloomy and the sun is blocked by the clouds, the camera will suggest you this setting.
- SUNNY DAY SETTING – When the day is sunny, the red light glows in this setting.
- VERY SUNNY SETTING – This setting is suggested by the camera when it is very brightly sunny (around noon with scorching sun).
- HI KEY – This is a very unusual setting because it makes the photo brighter than the camera thinks it should be. Don't use this setting if you are already outdoors in the sun as it will further brighten up the subject—seriously overdeveloping the photo. Always use it indoors or when the light on the subject is very low.
DON'T MISS: Christmas 2020 Special Rate for 50-sheet pack of Mini Film (arrives before Christmas)
3. Handle and load the film into the camera correctly.
The film pack is the most delicate item of any instant camera and the Instax Mini 9 is not an exception. The quality of photo that comes out of it depends on how you handle it, and this is one of the most common mistakes that leads your Instax Mini 9 photos to come out over or underexposed.
So, how do you avoid any film damage?
- You have to make sure the film is stored correctly. Neither too cold not too hot environment. Room temperature is preferred.
- When you are loading the film into the camera, don't squeeze the film or press in the NO FINGER area as that will damage the special chemical inside the pack required for the film to develop.
- It takes around 90 seconds to develop the photo after the film is printed during which you should not touch it or shake it or bend it.
4. Adjust the distance between the camera and object
The camera has the focal length of 60 cm meaning it can't focus onto the object closer than 60 cm. So, don't try taking photos closer than 60 cm as you will again waste the film. The flash on the Mini 9 is automatic and can't be turned off. It has a range of 2.7 metres, beyond which the light will not fall sufficiently on the subject resulting in under exposed or dark photos. Make sure to take care of both of these variables while taking the photos.
If taking closeup photos, use the closeup attachment provided in the camera (see video above).
Conclusion
Having over- or underdeveloped photos is a very frustrating problem while using the Fujifilm Instax Mini 9 camera. The average cost of one standard pack of Fujifilm instant film is $10. The pack contains 10 films which means that one film costs $1 on average. The fear ultimately boils down to not losing the film but losing the money and going through all the hassles to buy the pack again once it is finished. This article will help you not only save money, but also help you enjoy the instant camera moments with your family and friends without all the side-hassles. However, these four solutions should help rectify these issues.
Don't Forget: Instax Mini 9 limited edition offers in AMAZON.
Fujifilm Instax Mini 9 Box Scrapbook
Source: https://instantphotocam.com/instax-mini-9-pictures-come-out-black-white-blurry/
0 Response to "Fujifilm Instax Mini 9 Box Scrapbook"
Post a Comment